Start a clean Next.js project with TypeScript, ESLint and Prettier
Last updated: December 13, 2021 at 11:00 AM
TypeScript is awesome. So is Prettier.
In this post, we will learn how to configure ESLint to make it work with Prettier within a Next.js app, and finally how to integrate this tooling with Visual Studio Code.
Let's do it!
Note: you can have a look at the end result here: github.com/paulintrognon/next-typescript
Note: we will use yarn instead of npm throughout this post.
Initiating the project
The easiest and recommended way to get started is to use create-next-app:
yarn create next-app --typescript
This will create a bunch of boilerplate files which help you get started, including a basic .eslint config.
Jump to the generated source code and open up VSCode.
cd my-app
code .
Configure eslint
Eslint is installed by default (you should see the dependency in package.json).
You can run eslint with the following command:
yarn eslint .
To make eslint errors visible in VSCode, you need to install the ESLint plugin.
I also recommend you tell VSCode to auto-fix eslint errors on save. To do so, create a .vscode/settings.json file with the following content:
// .vscode/settings.json
{
  "editor.codeActionsOnSave": {
    "source.fixAll.eslint": true
  }
}
Let's try if it worked! Add the prefer-const rule to the .eslintrc.json config file:
// .eslintrc.json
{
  "extends": "next/core-web-vitals",
  "rules": {
    "prefer-const": "error"
  }
}
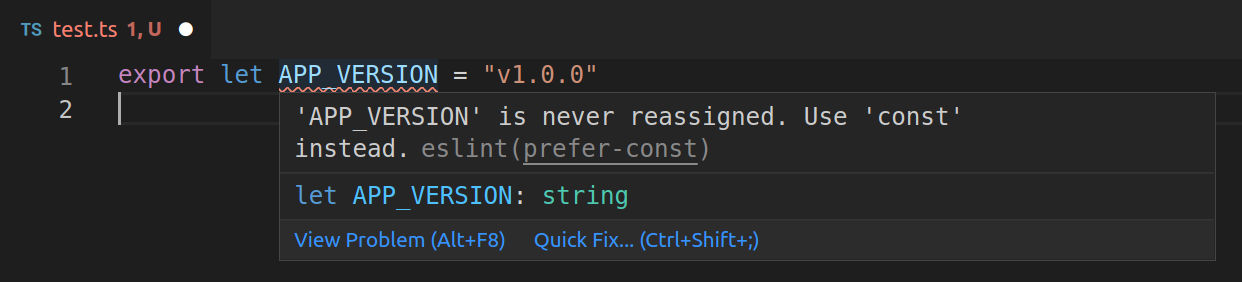
Now, create a test.ts file containing:
export let APP_VERSION = "v1.0.0"
VSCode should display an error, like so:
Try saving the file: VSCode should automatically convert the let into a const. If it did not work, try closing and reopening VSCode. Also double check that you did not forget the leading dot for the folder .vscode which contains the settings.json file.
To have a nice set of eslint rules, I suggest you install the package @typescript-eslint/eslint-plugin:
yarn add --dev @typescript-eslint/eslint-plugin
Then you can replace your .eslintrc.json file with:
{
  "plugins": ["@typescript-eslint"],
  "extends": [
    "next/core-web-vitals",
    "plugin:@typescript-eslint/recommended"
  ],
  "rules": {
    // I suggest you add those two rules:
    "@typescript-eslint/no-unused-vars": "error",
    "@typescript-eslint/no-explicit-any": "error"
  }
}
If you don't like a rule added by @typescript-eslint/recommended, don't forget you can turn it off in your .eslintrc.json, like so:
{
  // ...
  "rules": {
    "prefer-const": "off" // Turn rule off
  }
}
If you want more rules, check out other eslint extensions such as eslint-plugin-import, eslint-plugin-jest, etc.
Configure Prettier
Now that we have eslint up and running, let's add auto-formatting with Prettier.
First, add prettier dependencies:
yarn add --dev prettier eslint-config-prettier
prettieris the base package that will format the fileseslint-config-prettierwill prevent conflicts between prettier and eslint rules.
Create a .prettierrc.json file, and configure it according to your preferences. See all available options here: https://prettier.io/docs/en/options.html
// .prettierrc.json
{
  "semi": false,
  "trailingComma": "es5",
  "singleQuote": true,
  "tabWidth": 2,
  "useTabs": false
}
Then, change your .eslintrc.json file like so:
// .eslintrc.json
{
  // ...
  "extends": [
    "next/core-web-vitals",
    "plugin:@typescript-eslint/recommended",
    "prettier" // Add "prettier" last. This will turn off eslint rules conflicting with prettier. This is not what will format our code.
  ],
  // ...
}
Now let's configure VSCode to actually format our code on save according to our prettier configuration file. To do so, install VSCode's prettier plugin.
Then, you can tell VSCode to format the code on save, by editing our .vscode/settings.json file:
{
  "editor.codeActionsOnSave": {
    "source.fixAll.eslint": true
  },
  // Add those two lines:
  "editor.formatOnSave": true, // Tell VSCode to format files on save
  "editor.defaultFormatter": "esbenp.prettier-vscode" // Tell VSCode to use Prettier as default file formatter
}
From now on, every time you save a file, it will be formatted using prettier! You might need to restart VSCode to make that configuration work.
Note: If you want only specific file extensions to be formatted on save using prettier, do instead:
{
  // OR If want only typescript files to be formatted on save
  "[typescript]": {
    "editor.formatOnSave": true,
    "editor.defaultFormatter": "esbenp.prettier-vscode"
  }
}
Note: In a previous version of this blog post, I recommended including Prettier directly as ESLint rules (by using eslint-plugin-prettier. But I later learned that this approach is not recommended by prettier, as it is slower than using prettier directly. The package eslint-config-prettier that we use here is only to prevent conflicts between prettier and eslint.
Husky: Checking for errors, linting and formatting on commit
I strongly recommend you don't only rely on "format on save" VSCode features, but you also add another layer of safety by running eslint and prettier on each commit. That will make sure that every file you commit has no ESLint error and are correctly formatted. Also, you can run additional checks on commit, like TypeScript type-checking.
One way of achieving this is by using Husky, a little program that will run scripts for a given Git command.
# Install Husky
yarn add --dev husky
You then need to enable husky by running:
yarn husky install
⚠️ In the future, after you or someone else clone the project, you will need to run yarn husky install to enable husky
Now we need to add the git hook:
yarn husky add .husky/pre-commit "yarn tsc --noEmit && yarn eslint . && yarn prettier --write ."
Let's break down what this command does. On each commit, husky will:
- Run the
tsccommand to make sure there are no TypeScript errors - Run the
eslintcommand to make sure there are no ESLint errors - Format our code using prettier
To try if it works, try messing up with the code (for example, replace export const APP_VERSION = 'v1.0.0' with export const APP_VERSION: number = 'v1.0.0' in the test.ts file we created earlier) and try to commit. This should happen:
$ git add -A
$ git commit -m "test"
yarn run v1.22.5
$ /home/paulin/perso/projets/paulintrognon/tests/foobar/node_modules/.bin/tsc --noEmit
test.ts:1:14 - error TS2322: Type 'string' is not assignable to type 'number'.

1 export const APP_VERSION: number = 'v1.0.0'
               ~~~~~~~~~~~


Found 1 error.

error Command failed with exit code 2.
info Visit https://yarnpkg.com/en/docs/cli/run for documentation about this command.
husky - pre-commit hook exited with code 2 (error)
Note: If you want to skip the check, you can add a --no-verify flag to your commit command. For example: git commit --no-verify -m "Update README.md"
Lint staged: only check your code when necessary
Checking your code takes time, even more so when the project gets bigger. Sometimes you change only markdown files or CI yaml files, and you don't need your TypeScript code to be checked.
Enters Lint staged, which goal is to only run your lint scripts when necessary, and only on the necessary files.
Install lint-staged
yarn add --dev lint-staged
Configure lint-staged
Create a configuration lint-staged.config.js file for lint-staged. Some prefer to configure it directly in package.json, but we have more options by configuring via a dedicated file.
// lint-staged.config.js
module.exports = {
  // Type check TypeScript files
  '**/*.(ts|tsx)': () => 'yarn tsc --noEmit',

  // Lint then format TypeScript and JavaScript files
  '**/*.(ts|tsx|js)': (filenames) => [
    `yarn eslint --fix ${filenames.join(' ')}`,
    `yarn prettier --write ${filenames.join(' ')}`,
  ],

  // Format MarkDown and JSON
  '**/*.(md|json)': (filenames) =>
    `yarn prettier --write ${filenames.join(' ')}`,
}
As property names, you have the file matchers. As property values, you have the command(s) that will be run against the changed files.
Each matcher will be run in parallel, but the array values will be run in sequence. We have separated TypeScript checks and ESLint checks into 2 matchers so that they can be run in parallel. We have to separate prettier format of TS files and other files, because we don't want ESLint to fix errors in TS files and at the same time having Prettier format the files: that would results in conflicts.
For the TypeScript (tsc) command, we don't pass filenames as TypeScript cannot be run on isolated files.
Now we need to change our pre-commit hook (in the .husky/pre-commit file):
#!/bin/sh
. "$(dirname "$0")/_/husky.sh"

yarn lint-staged # Replace the last line with "yarn lint-staged"
Let's try the new configuration. Try committing the test.ts file from earlier. If it contains errors, you won't be able to commit it.
git add test.ts # Add a file with TypeScript errors...
git commit -m "add test.ts" # ...and this will fail!
Now try editing and committing the README.md file. On commit, you will see that only the prettier script will be run, and not the other ones.
git reset # un-add files
echo "Hello!" >> README.md # Edit README.md
git add README.md # Stage README.md
git commit -m "update readme" # ...and only prettier will run on commit!
Good job reading this far!
You are now ready to write beautiful TypeScript code without having to worry about committing anything dirty! :)
You can have a look at the end result here: https://github.com/paulintrognon/next-typescript
If you clone this repository, don't forget to run yarn husky install to enable husky
That's all folks!
You can give me feedback on github: https://github.com/paulintrognon/paulintrognon.fr/issues/8
Official Next.js TypeScript documentation: https://nextjs.org/docs/basic-features/typescript
Thanks for reading and happy coding!